

It’s User Serviceable if You Have Gift Wrap and Weather Strip
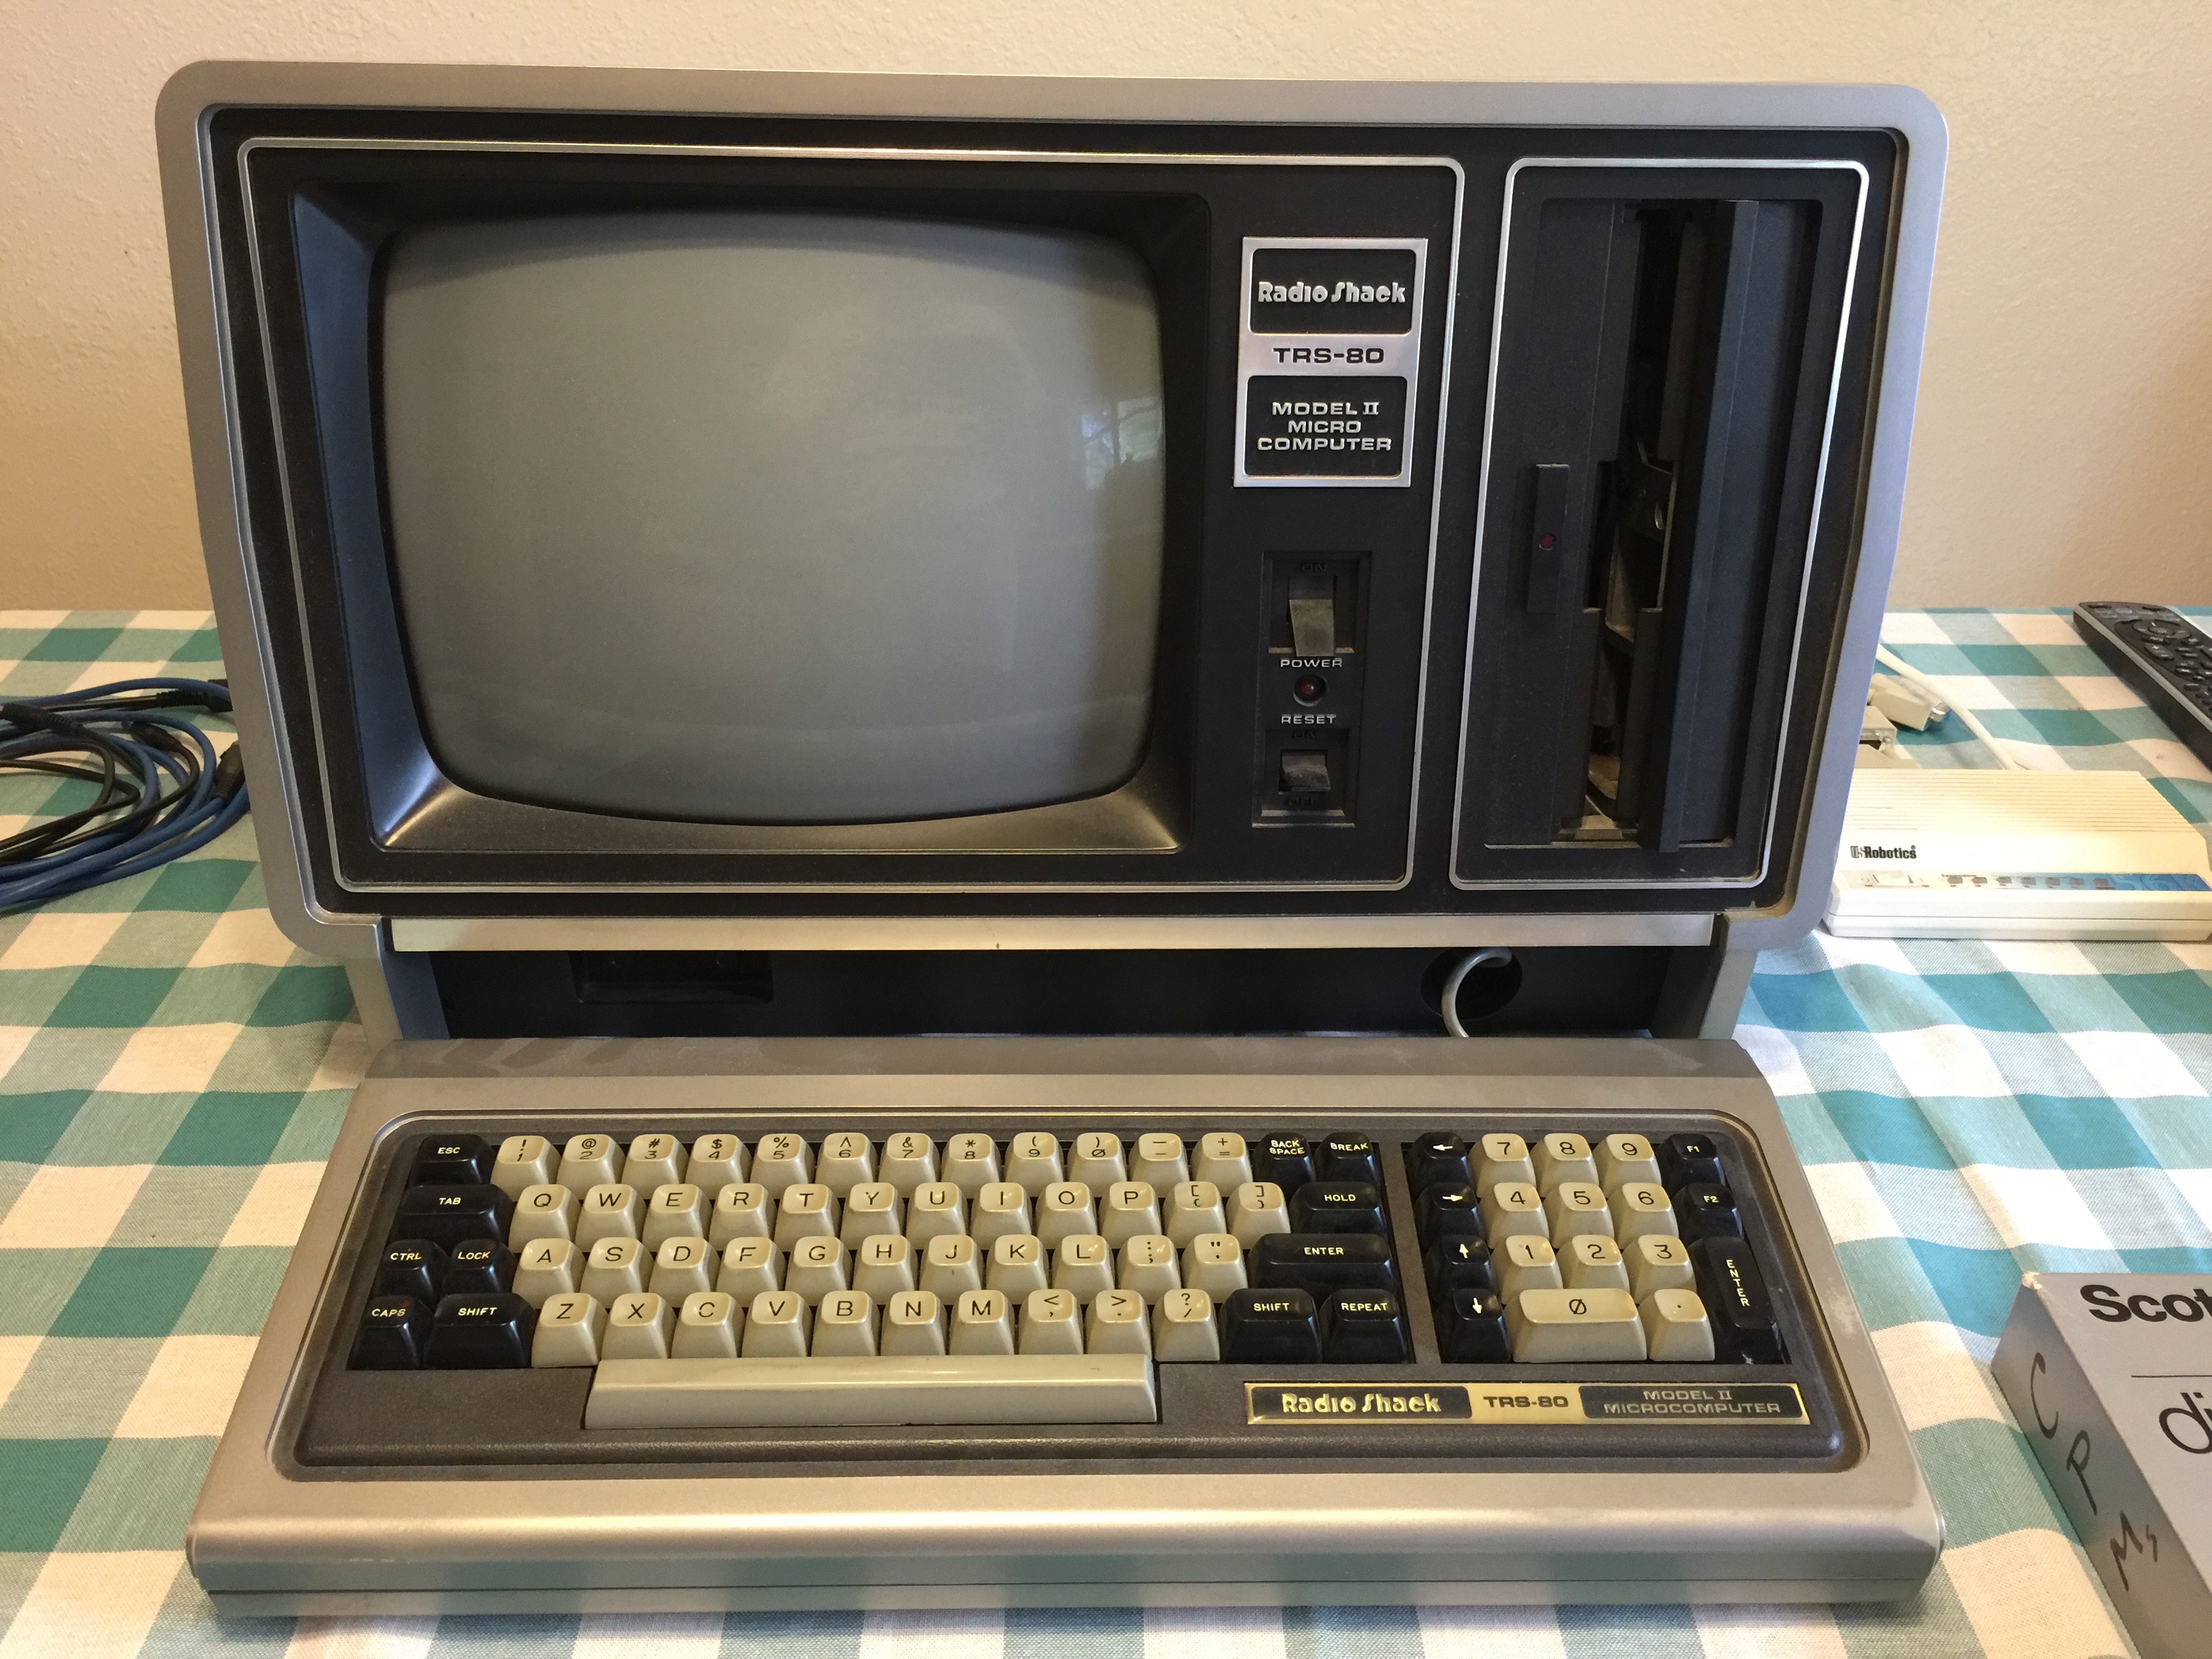 My TRS-80 Model II
Last weekend one of my usual sources of inspiration, @duhproject, received a Commodore 128. A lot of people on Twitter started talking about their 128s, so I had to get mine out too. I thought it would be interesting to try out a true 80 column terminal program under CP/M since it was something that the 128 could do that that 64 doesn’t. It didn’t take long before I decided that running CP/M from a 5.25” drive wasn’t “CP/M enough” and I had to see if I could do anything to repair the TRS-80 Model II that I picked up a couple of years ago. When I had powered up the TRS-80 it seemed that the computer worked fine but many of the keys on the keyboard were dead. I ended up putting it aside because I needed to get ready for my annual 4th of July party, and after the party a lot of other things came up so I didn’t get back to it.
My TRS-80 Model II
Last weekend one of my usual sources of inspiration, @duhproject, received a Commodore 128. A lot of people on Twitter started talking about their 128s, so I had to get mine out too. I thought it would be interesting to try out a true 80 column terminal program under CP/M since it was something that the 128 could do that that 64 doesn’t. It didn’t take long before I decided that running CP/M from a 5.25” drive wasn’t “CP/M enough” and I had to see if I could do anything to repair the TRS-80 Model II that I picked up a couple of years ago. When I had powered up the TRS-80 it seemed that the computer worked fine but many of the keys on the keyboard were dead. I ended up putting it aside because I needed to get ready for my annual 4th of July party, and after the party a lot of other things came up so I didn’t get back to it.
 Capacitive keyboard internals
The keyboard is a capacitive keyboard, similar to the keyboards used on a SOL-20 or Apple Lisa. It uses pads attached to each key that squish against the circuit board. The pads are made with foam and aluminized Mylar which cause a change in capacitance which is sensed by the circuit board instead of actually connecting two contacts together. After 30 years though the foam had degraded and many of the pads had compressed and could no longer press against the circuit board.
Capacitive keyboard internals
The keyboard is a capacitive keyboard, similar to the keyboards used on a SOL-20 or Apple Lisa. It uses pads attached to each key that squish against the circuit board. The pads are made with foam and aluminized Mylar which cause a change in capacitance which is sensed by the circuit board instead of actually connecting two contacts together. After 30 years though the foam had degraded and many of the pads had compressed and could no longer press against the circuit board.
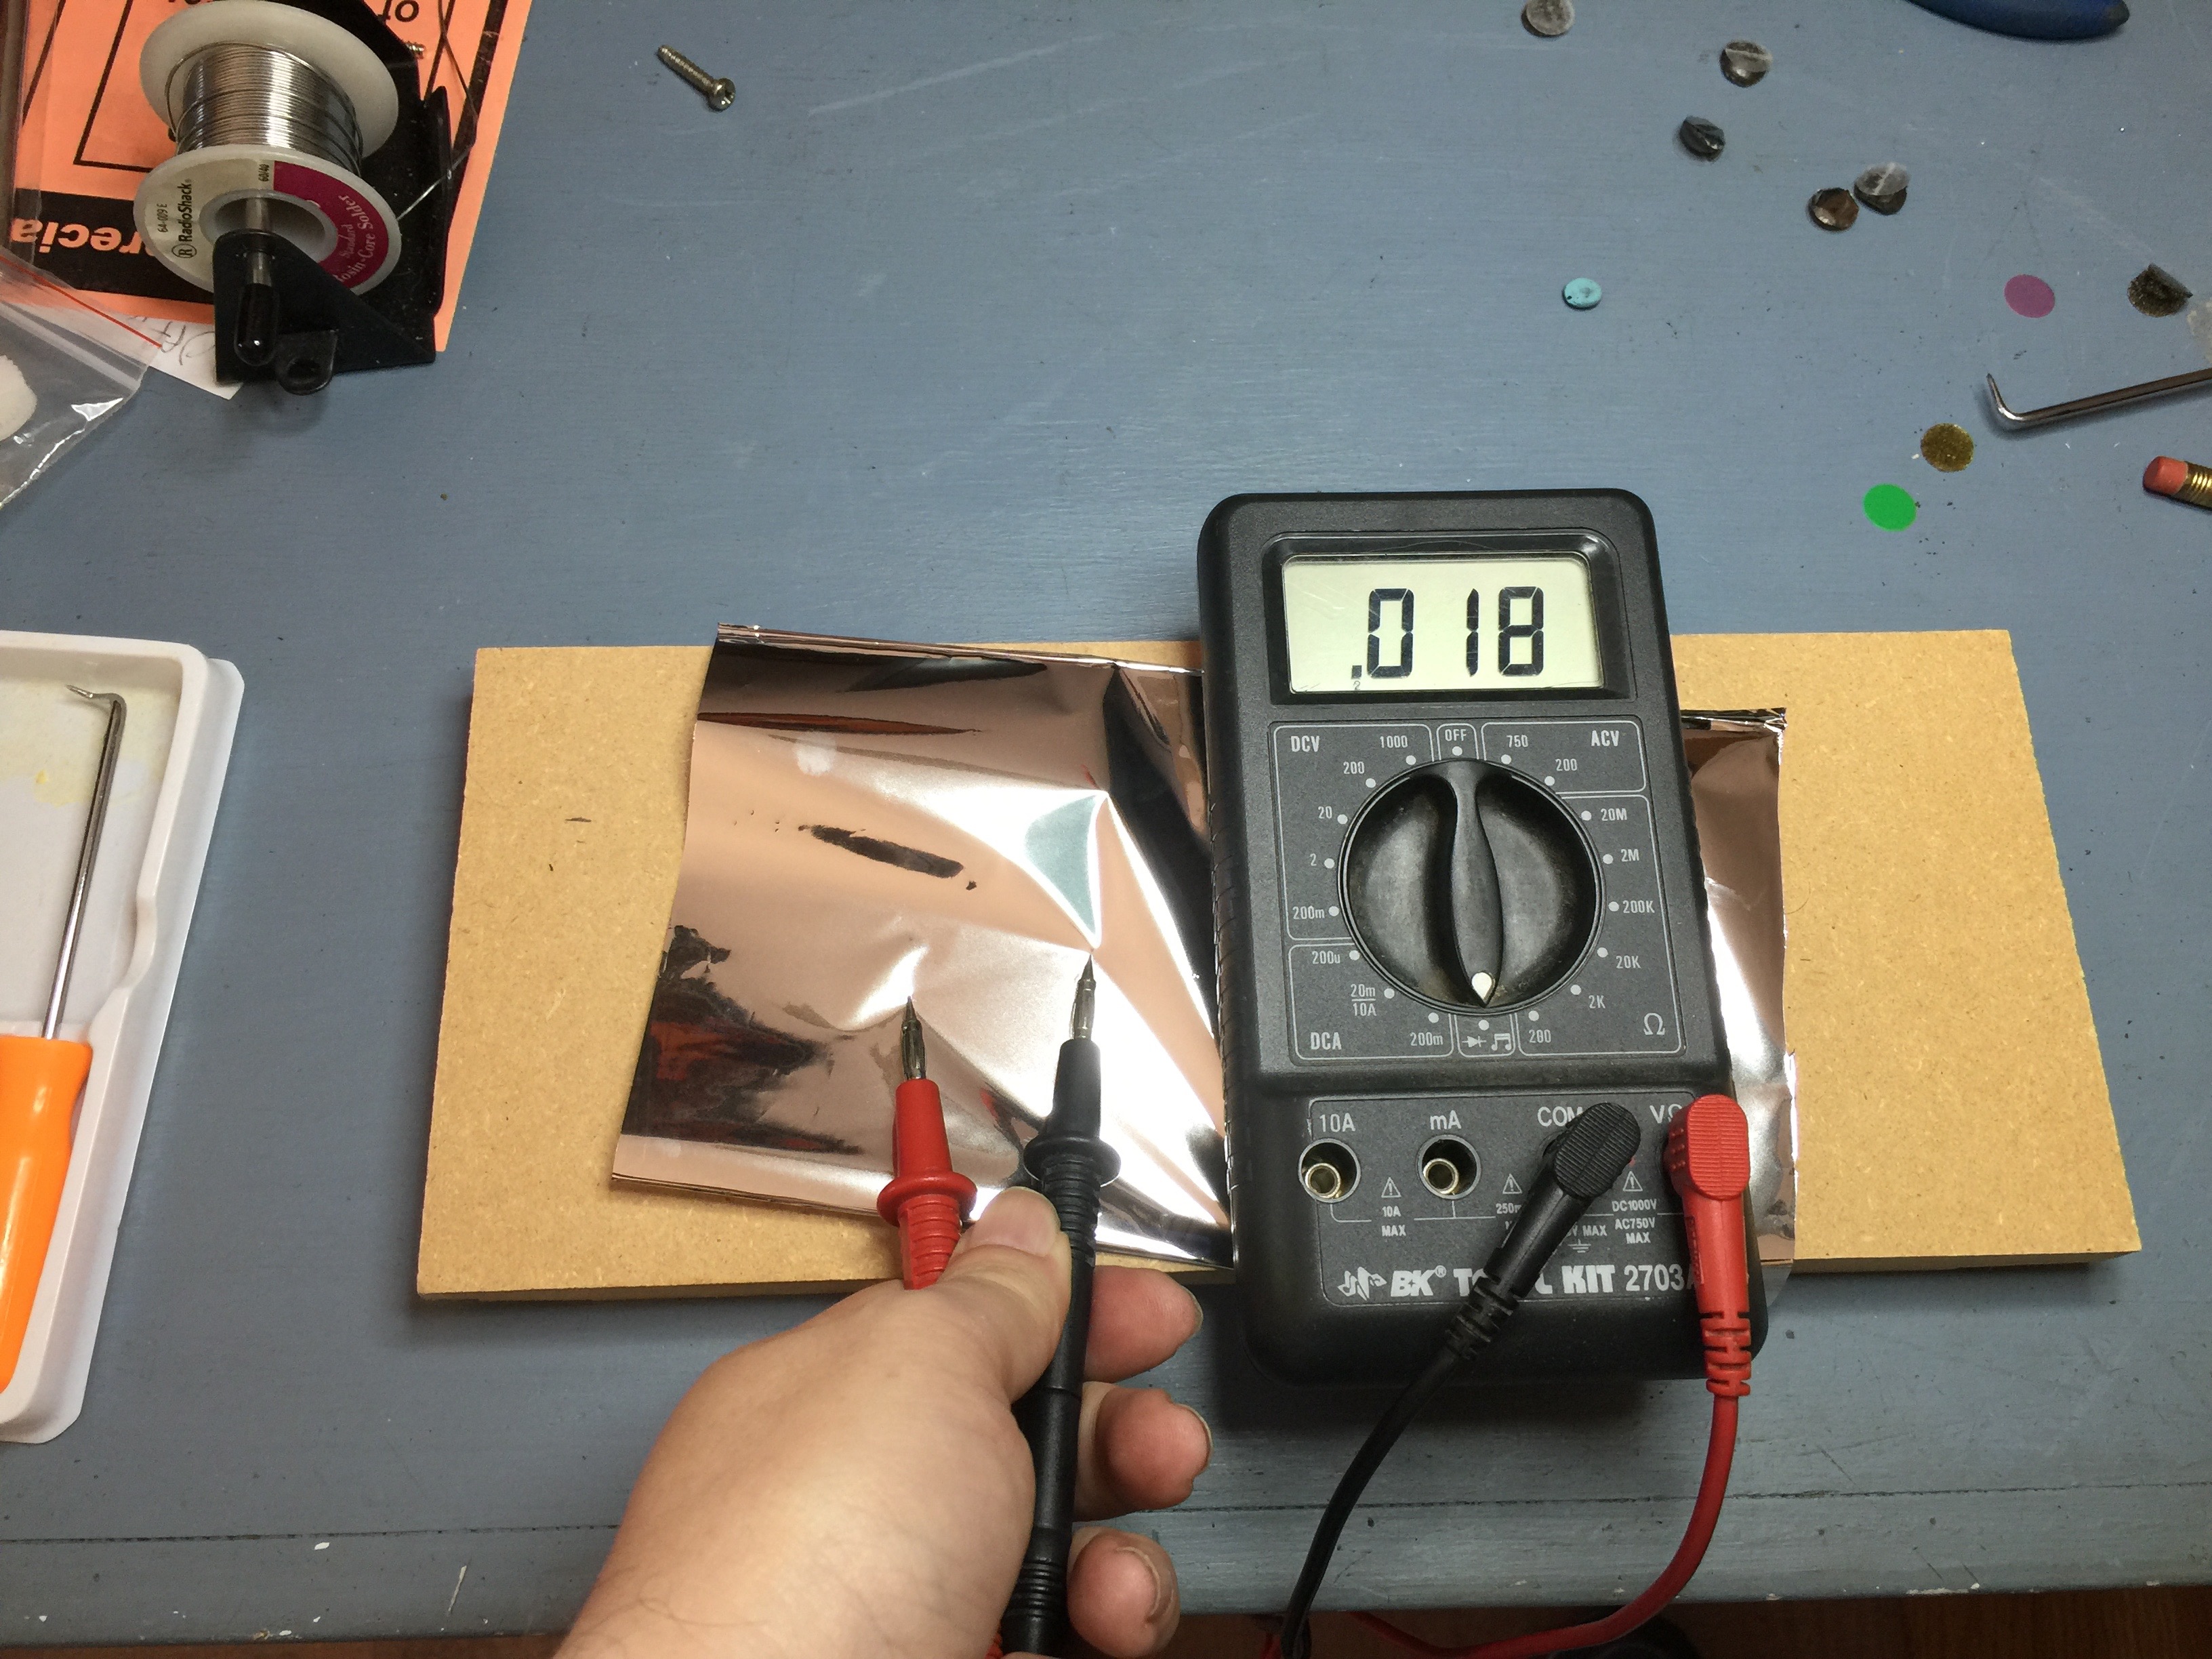
I saw a lot of posts about what people were going through to try to repair their capacitive keyboards. Most people were using space blankets and foam they ordered online, then trying to re-use the plastic disks from the original keyboard. I thought that I could probably use some Mylar metalized gift wrap I got at Dollar Tree and maybe some weather strip which already had one sticky side. For the plastic backing I used a snap closure envelope. The plastic of the envelope was exactly the same thickness as the clear plastic backing on the original pads, although it’s slightly softer and more flexible.
Finding weather strip the right size was challenging. I wanted something around 3/16” or 4.5mm thick and wide enough to make pads that would be 7/16” or 11mm in diameter. Thickness doesn’t have to be perfect, it just needs to be long enough to squish against the PCB. If it’s not pressed completely down then it doesn’t register, so if it’s just a little thicker than the original pads it’s not a problem. I found vinyl weather strip that was 3/16” thick and 3/4” wide. Perfect! Or not. The vinyl foam was not very compressible and didn’t feel right in the key I tested it on, and the vinyl foam doesn’t work to create the capacitance. Back to the home center to see what else I could find. Scouring the entire shelf I found rubber foam that was only 3/8” or 9.5mm wide. Not quite wide enough, but I thought I might be able to put two strips next to each other and the Mylar on the bottom and the plastic disk on the top might hold it together.
Did some testing with the rubbber weather strip to make sure the circuit would see my pads. Replaced just 4 keys and put the keyboard back together for testing. It worked perfectly!
 Make sure you get the conductive side up!
I taped the Mylar to a scrap of MDF to stretch it out and try to keep it flat. One side of the Mylar is conductive and it’s important to make sure you put the conductive side up. If you get it backwards it will short out the contacts on the PCB and the keyboard will go wacky registering keys. When making my second batch of disks I remembered to double check before taping the Mylar down. On my first batch I just got lucky.
Make sure you get the conductive side up!
I taped the Mylar to a scrap of MDF to stretch it out and try to keep it flat. One side of the Mylar is conductive and it’s important to make sure you put the conductive side up. If you get it backwards it will short out the contacts on the PCB and the keyboard will go wacky registering keys. When making my second batch of disks I remembered to double check before taping the Mylar down. On my first batch I just got lucky.
After all the weather strip is applied, I sprayed adhesive on the top and then attached a strip cut from the plastic envelope and pressed it down firmly. It only takes a few seconds for the spray adhesive to set, so as soon as it was attached I started cutting out the disks. To cut the disks I used a 7/16” hollow punch tool. Amazon has some for around $9, but I went for a more expensive set because I thought the ability to make O-rings might be handy some day.
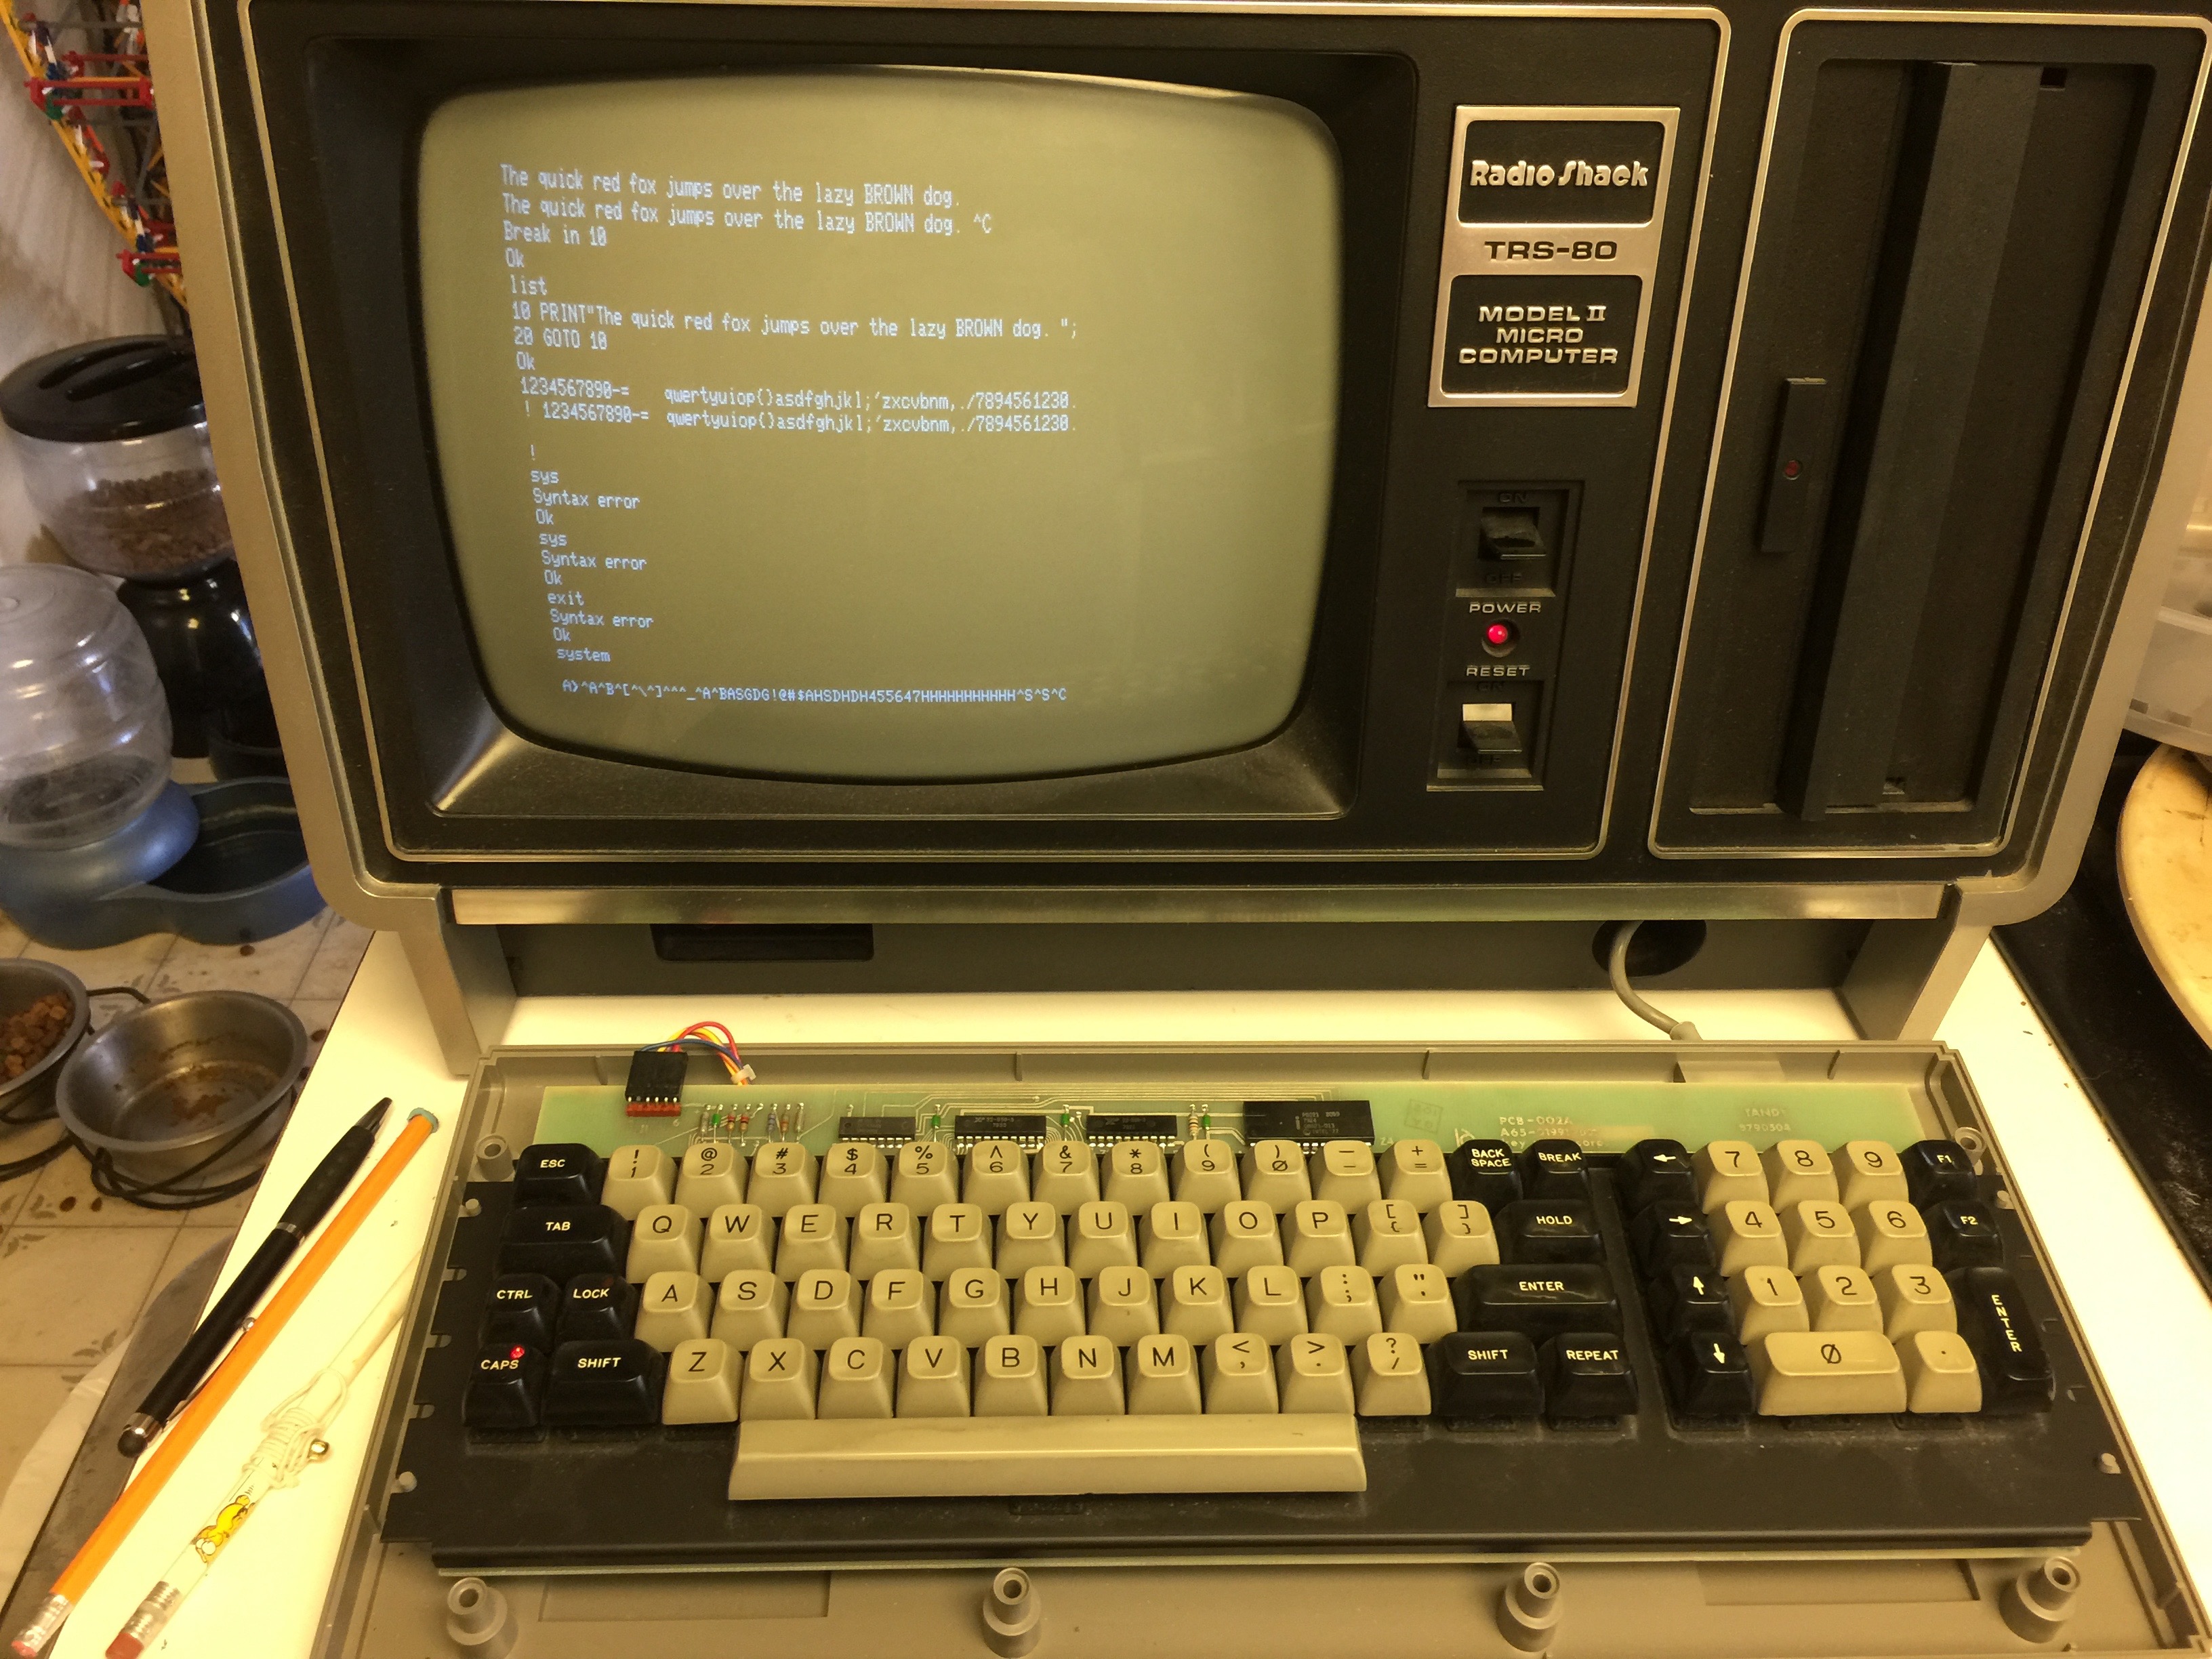 All the keys work!
After more than enough disks were cut I used a small hook to pop all the old disks out of each key. To insert the new ones I made a little tool using more of the envelope plastic wrapped around a drill bit. I would place a pad on a key and then use my homemade tool to snap it in under the clips. With all the new pads installed it was time to test things out. Would every single key work? Yes! On the very first try every single key worked!
All the keys work!
After more than enough disks were cut I used a small hook to pop all the old disks out of each key. To insert the new ones I made a little tool using more of the envelope plastic wrapped around a drill bit. I would place a pad on a key and then use my homemade tool to snap it in under the clips. With all the new pads installed it was time to test things out. Would every single key work? Yes! On the very first try every single key worked!
I had been putting off this fix for a long time because I was dreading that it was not going to be as easy as it seemed. It turned out that it really was pretty simple and it cost me less than $5 in supplies. The only question now is how long will it be before the weather strip decays and has to be replaced? Check back in several years and maybe you’ll find out!
-

-
My TRS-80 Model II
-
Capacitive keyboard internals
-
Typing with my bare fingers
-
A variety of possible materials
-
Thickness of original disk is 0.17mm
-
We have a winner!
-
Materials I used
-
Make sure you get the conductive side up!
-
Attaching the self-adhesive weather strip to the Mylar
-
Gluing on the plastic backer
-
Punching out all the disks
-
My homemade installation tool
-
The disk is held by small clips
-
My homemade tool presses the disk under the clips
-
All the keys work!
-
No, I'm pretty sure I just serviced it!


