

Unlocking a Cisco SPA122 for use with any provider
I thought it would be nice to make a portable PBX that could travel with me when I take some of my retro computers places to demo them. The PBX would let me demonstrate how dial-up works without needing to find an actual working land-line, and if a land line was even available, without having to make an expensive long distance call. I can't remember what keywords I was looking for but the first model I came across was a Cisco SPA122 and when I looked on eBay there was one with a Buy-it-Now for under $10 shipped so I snapped it up.
When it arrived I wasn't able to log into it using the admin/admin password and even holding down reset didn't seem to clear it. Searching the internet provided no information on how to get into it if the admin/admin password didn't work, and if it was actually locked to a carrier it seemed there was no way to do anything with it. So of course I immediately took it apart to see if there were any interesting headers on it.
 Pads for headers
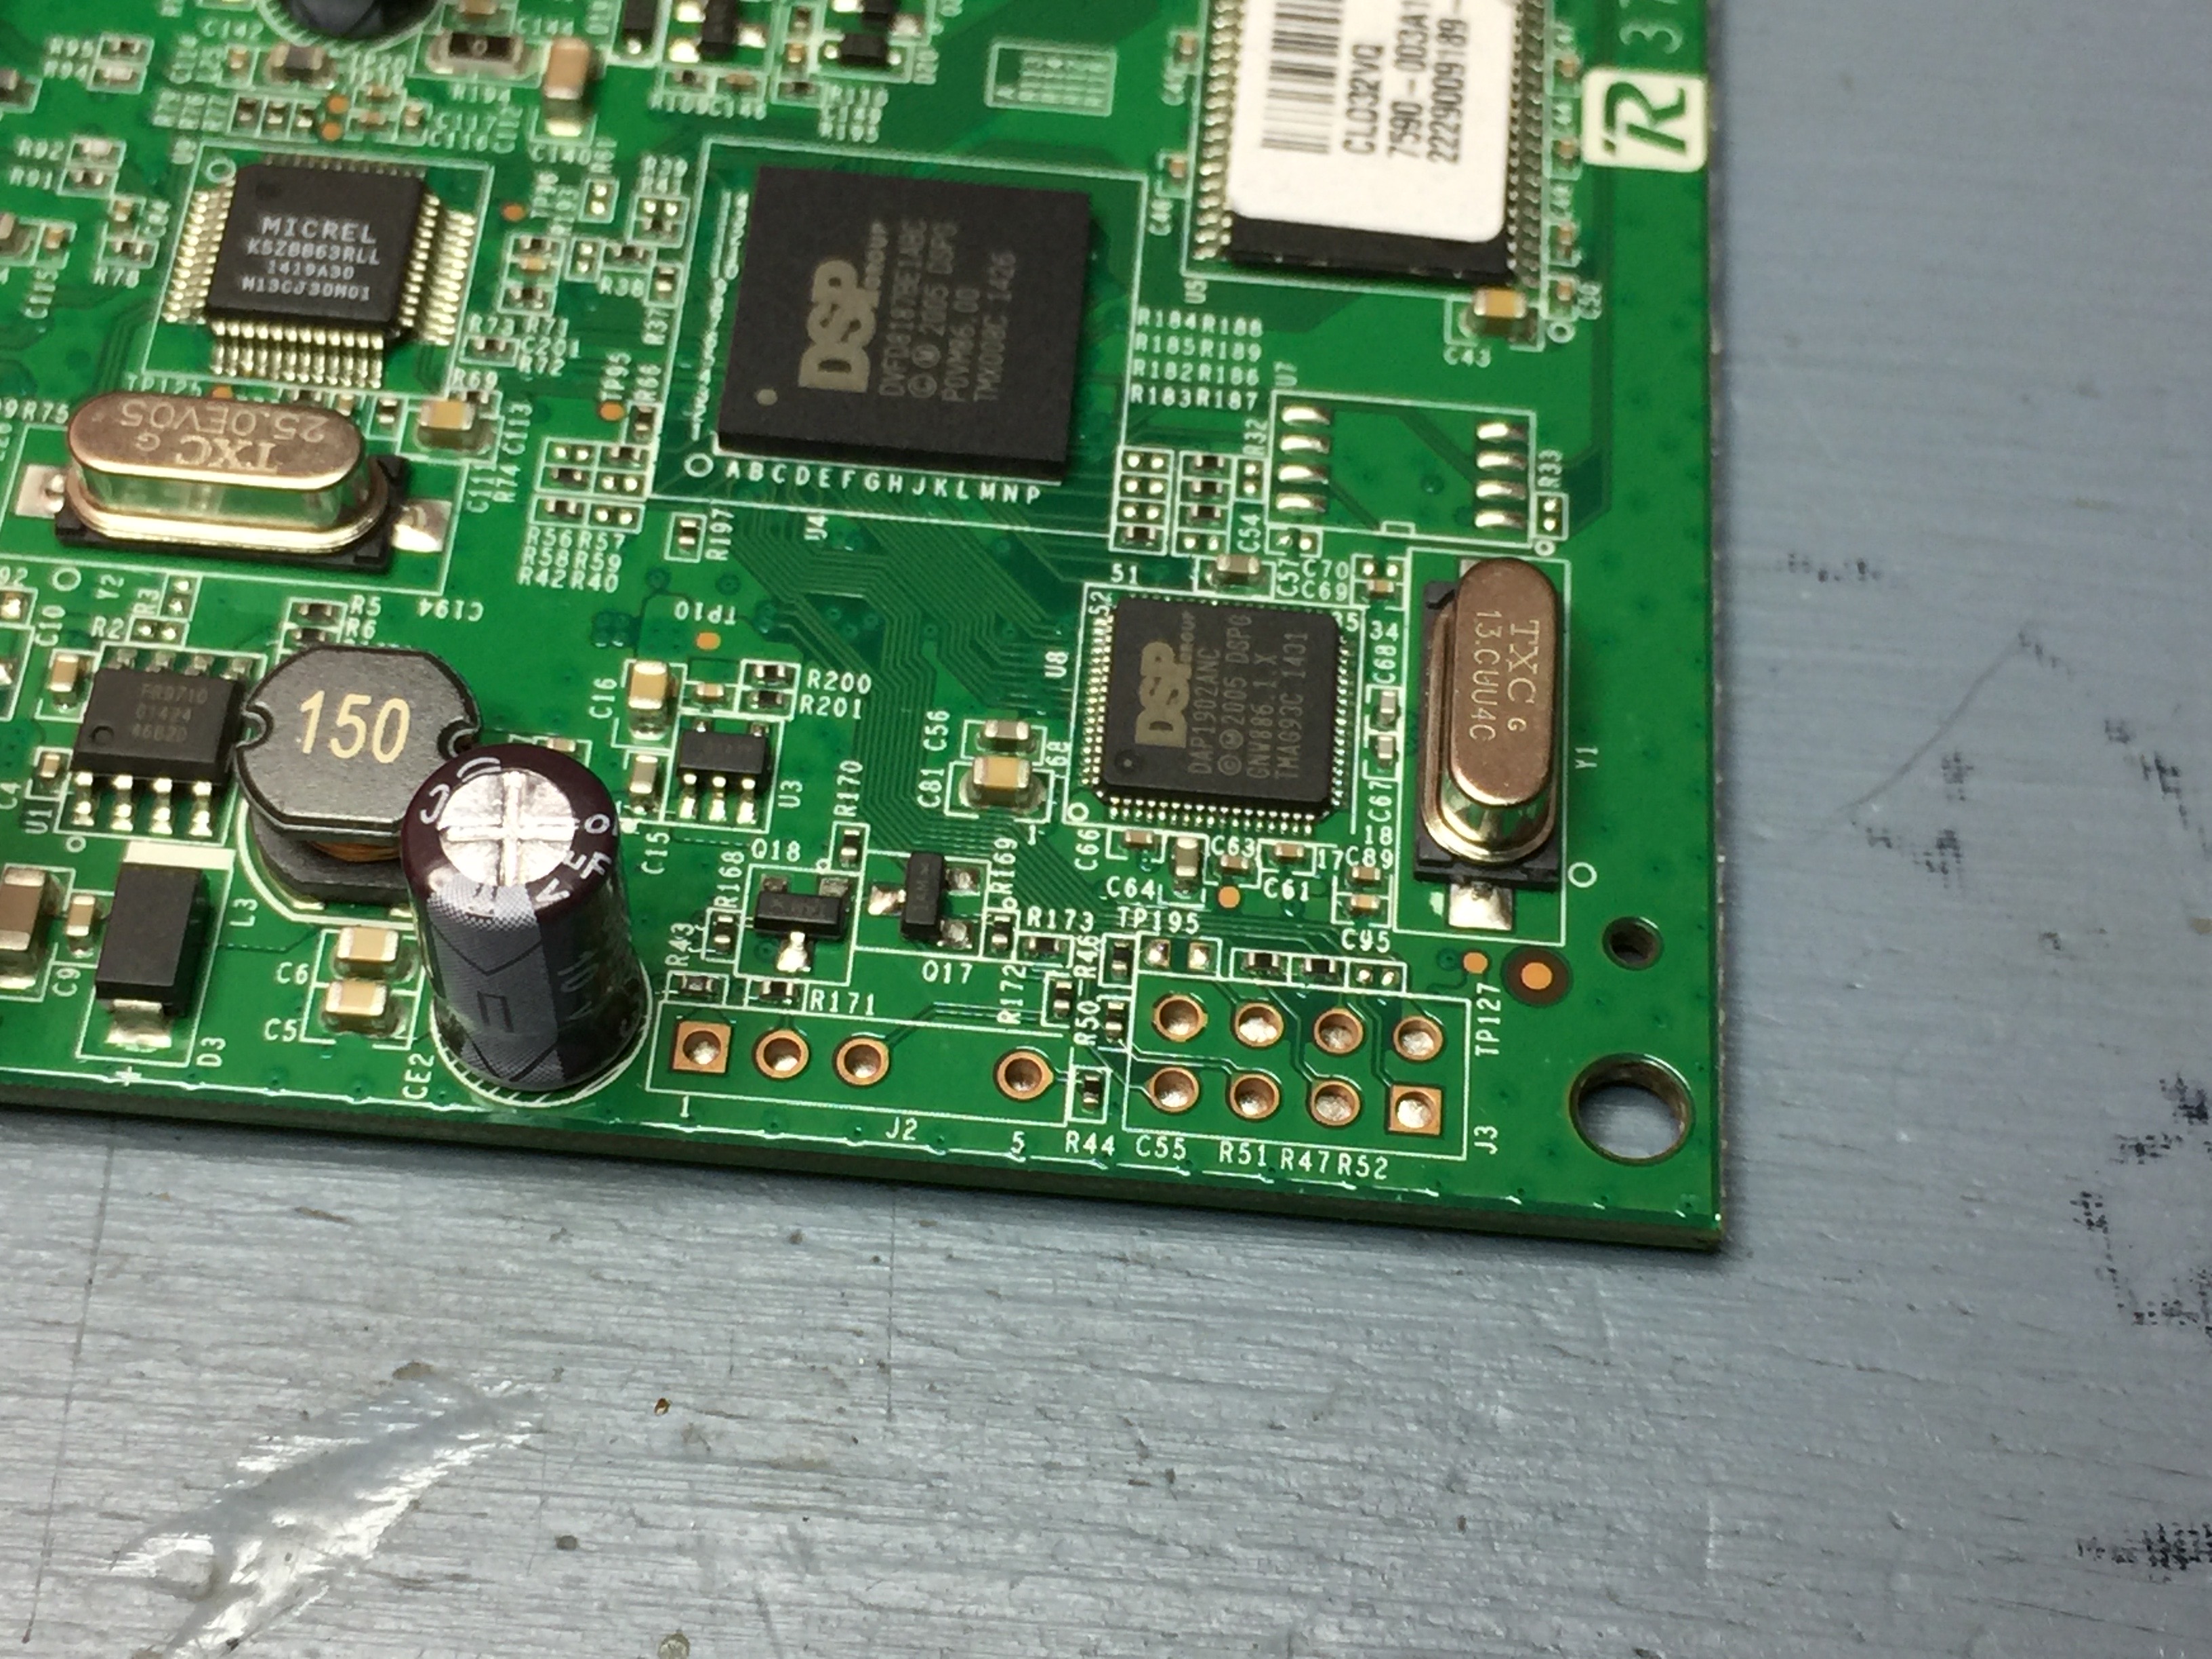
I found two unpopulated pads in the corner: J2 with 5 pins, and J3 with 8 pins. Suspecting that J2 is probably a serial interface, and J3 could be a JTAG interface I went ahead and soldered headers onto them.
Pads for headers
I found two unpopulated pads in the corner: J2 with 5 pins, and J3 with 8 pins. Suspecting that J2 is probably a serial interface, and J3 could be a JTAG interface I went ahead and soldered headers onto them.
The easiest thing to test first was the serial interface. Using my multimeter I quickly determined that pin 5 was GND and pin 1 was VCC which only left two other pins. I hooked up a 3v3 USB TTL serial adapter to pins 2, 3, and 5, fired up Kermit on a Linux box with it set to 115200 and powered on the SPA122. Sure enough, there was a serial console! I got lucky on the first try and managed to get the RX/TX pins the right way.
"It's a UNIX system! I know this!"
Seeing Linux boot gave me hope that this might be something I could actually hack into. After Linux boots up and has dumped lots and lots of console messages, pressing enter will print a Login: prompt. Unfortunately the password wasn't something easy like root/root or admin/admin.
 Overriding boot
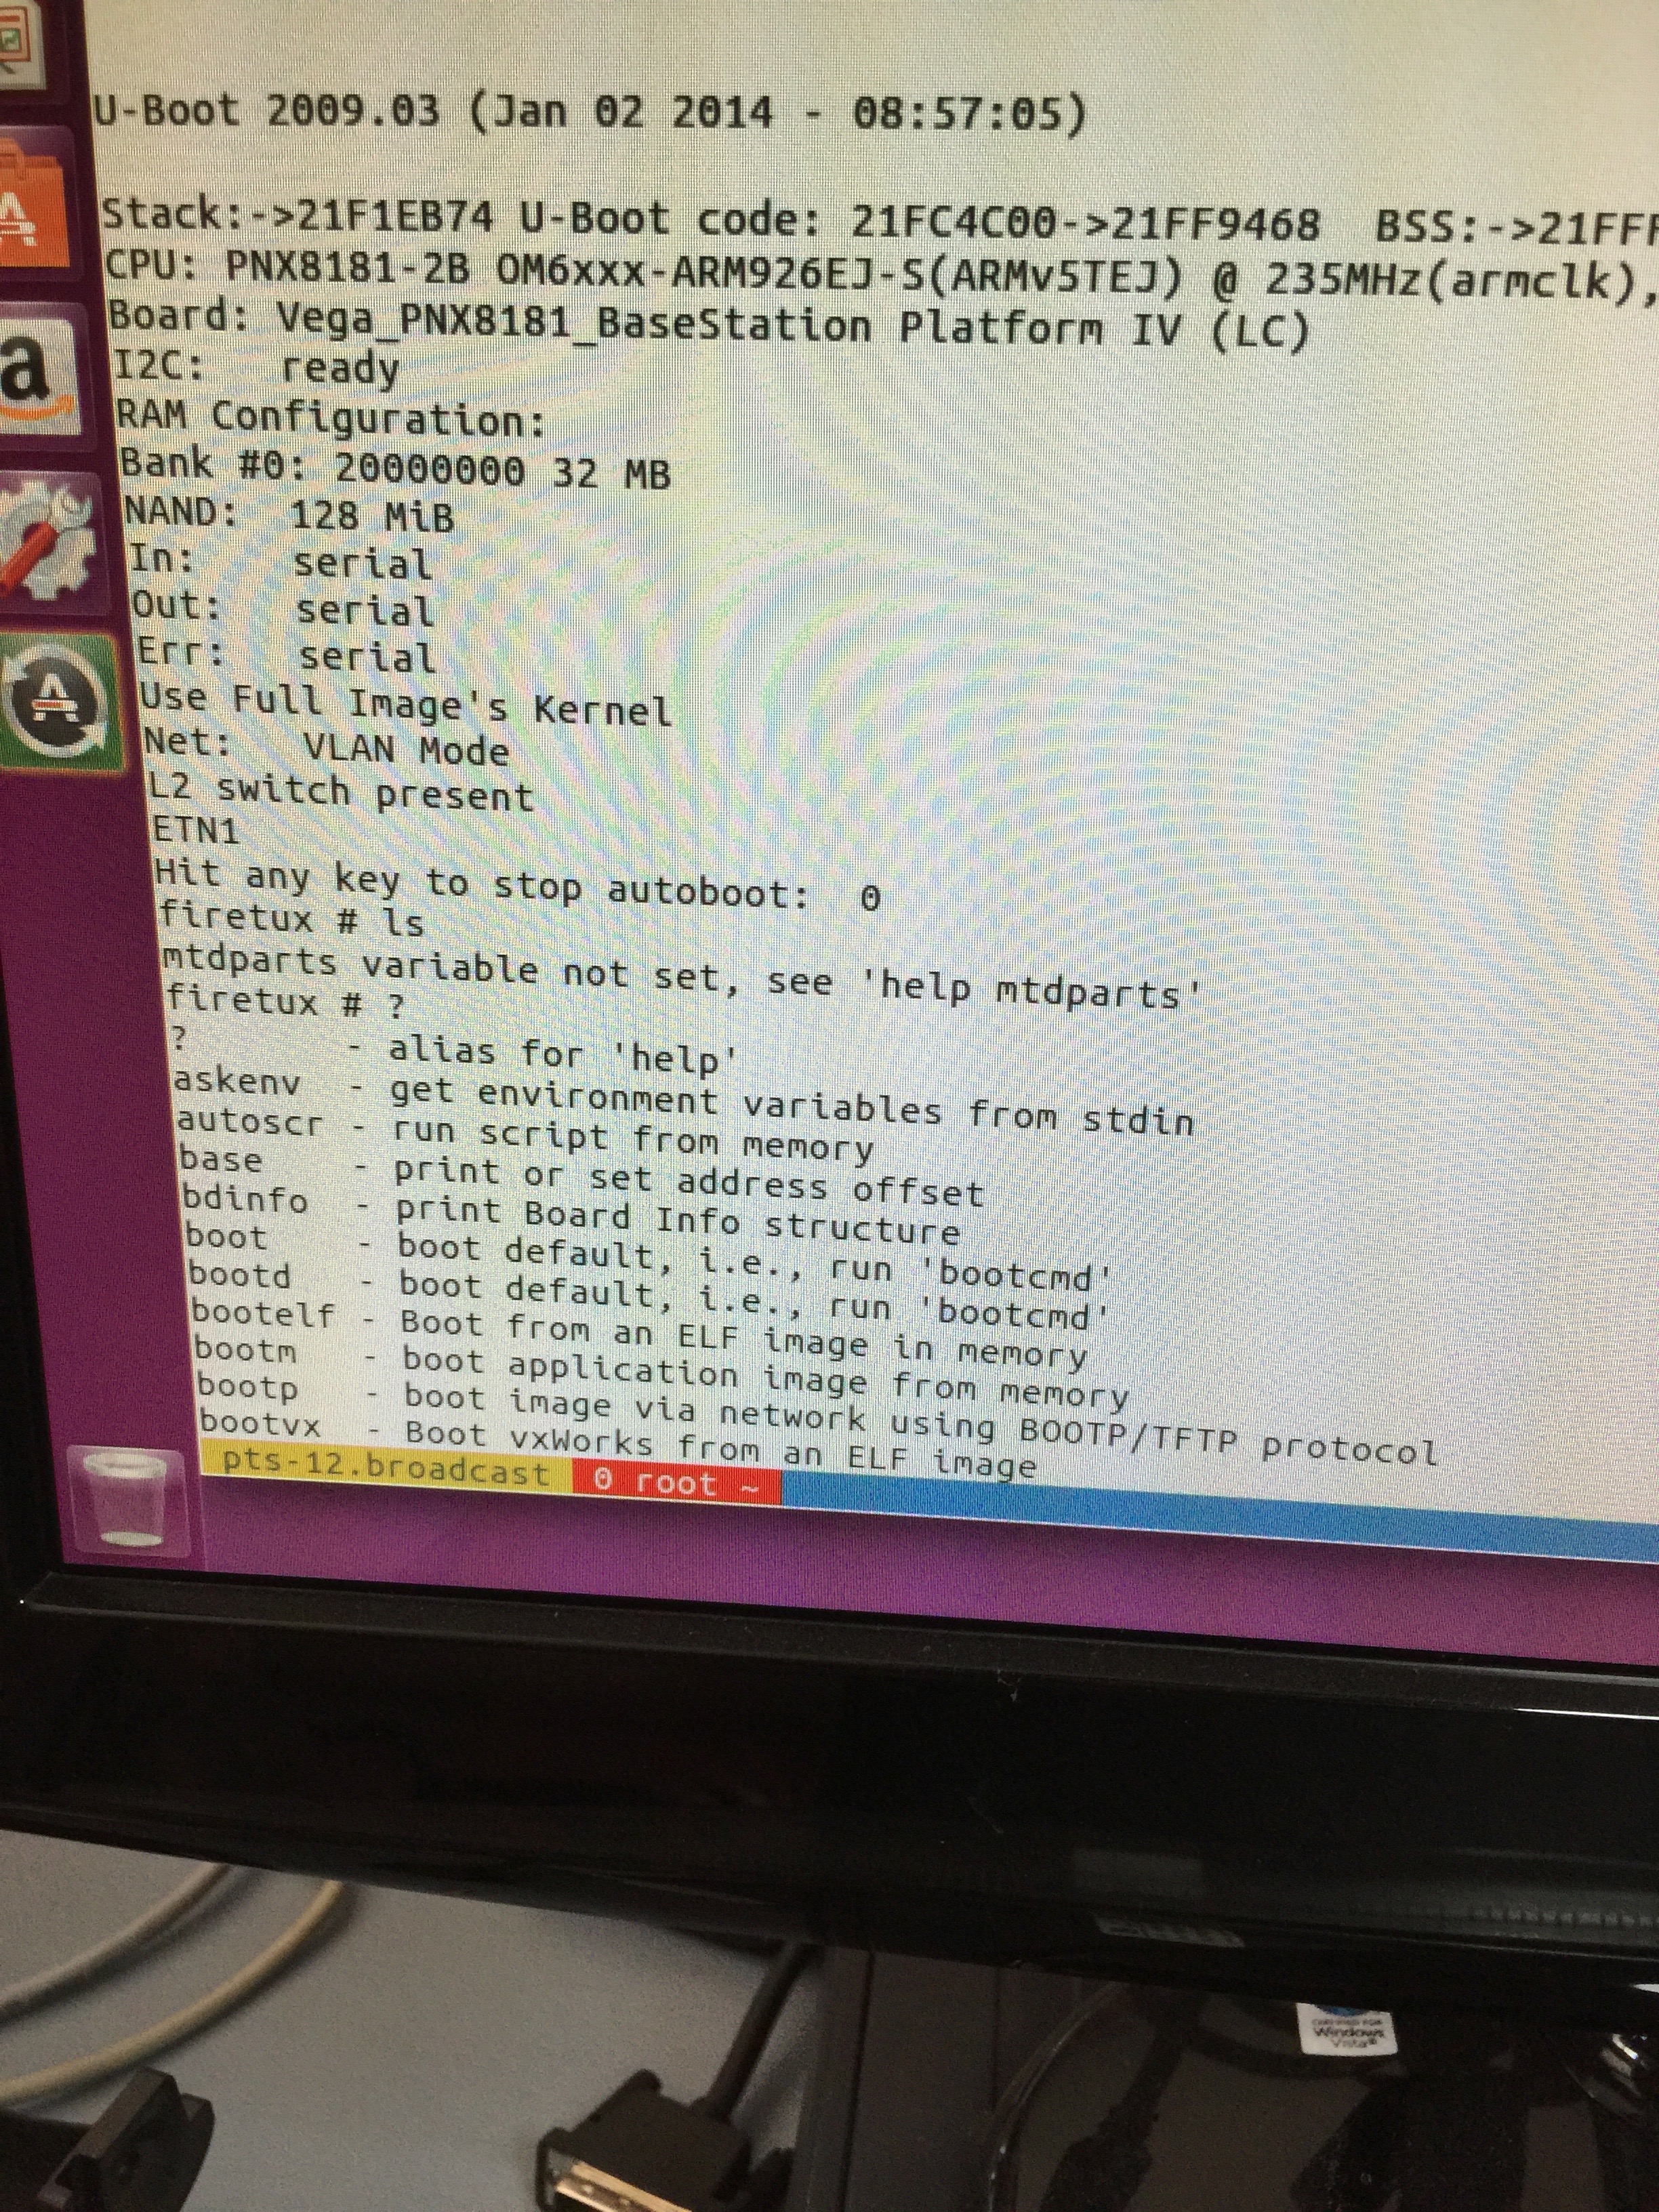
Looking back at the console log I saw that very early on there was a "Hit any key to stop autoboot" message. That sounded interesting! I unplugged the SPA122, held down the space bar on my keyboard, and plugged it back in. The autoboot was stopped and I was presented with a "firetux #" prompt. I'm in! Well, not yet, but it's something.
Overriding boot
Looking back at the console log I saw that very early on there was a "Hit any key to stop autoboot" message. That sounded interesting! I unplugged the SPA122, held down the space bar on my keyboard, and plugged it back in. The autoboot was stopped and I was presented with a "firetux #" prompt. I'm in! Well, not yet, but it's something.
Typing help dumped a list of commands that the boot loader supported. Lots of interesting things, including a printenv command. Using printenv gave me quite a lot of info, including a variable called bootargs. Hmm, that looks a lot like Linux boot parameters! I appended init=/bin/sh to the bootargs variable, booted it up, and there was my shell prompt. Success!
After a bit of fiddling around I discovered that at some point the SPA122 had reset itself to admin/admin on the web console and apparently my initial attempts to do a factory reset had simply failed.
Expecting that I had figured out quite a bit about how the system works and that I could probably break into a locked SPA122, I setup a saved search on eBay to keep an eye out for another SPA122 for cheap that was locked. The very next day one showed up for under $10 shipped that was listed as locked to RingCentral so I snatched it up.
Hack attempt part II
 Locked SPA-122
The first thing I did upon arrival of the new RingCentral SPA122 was open it up to see if the board was identical. I was a little worried that a locked system might have a different board without the J2 serial connector. But not only did I discover that J2 was there, but that a previous owner had already soldered on the header apparently in an attempt to unlock it!
I plugged in the ethernet, the phones, and power to the RingCentral SPA122 to see if I could log in as admin/admin on the web page. Nope, I could only get in as cisco/cisco but that didn't allow me to do much. I couldn't change the SIP settings, change passwords, or upgrade the firmware. I tried resetting it to factory defaults by holding down the reset button for 10-15 seconds and that didn't get admin/admin working either. Dialing 73738# on an extension came back and said "Invalid option." It was definitely still locked to RingCentral!
Going back to my notes from the previous unit, I was quickly able to get into the locked one on the serial console and get a shell. I mounted the nvram partition and pulled off the nvram.data file to see what was in it. Sure enough, the admin login looked quite different from the unlocked & factory reset SPA122.
http_auth=admin,enc=0cfc68600bcb509fce098e0b7bab9035,0;cisco,cisco,1
Changing the entry to
http_auth=admin,admin,0;cisco,cisco,1
 Unlocked!
and rebooting and then going to the web interface I could now login as admin/admin. I could now see the Quick Setup page and fill in values but I was still not able to get the lines to register with my asterisk server. I decided at this point to go ahead and try updating the firmware so I downloaded the latest version from Cisco and went into the Administration page and let it do the firmware upgrade. It successfully installed and after it booted I was able to use 73738# on a phone to do a reset. After logging back in as admin/admin I entered the SIP info for my phones and they registered and I was able to make calls to all of the extensions on my Asterisk PBX!
Unlocked!
and rebooting and then going to the web interface I could now login as admin/admin. I could now see the Quick Setup page and fill in values but I was still not able to get the lines to register with my asterisk server. I decided at this point to go ahead and try updating the firmware so I downloaded the latest version from Cisco and went into the Administration page and let it do the firmware upgrade. It successfully installed and after it booted I was able to use 73738# on a phone to do a reset. After logging back in as admin/admin I entered the SIP info for my phones and they registered and I was able to make calls to all of the extensions on my Asterisk PBX!
Proceed at your own risk
Solder on a 5 pin header to J2 with pin 4 pulled and attach 3v3 USB TTL serial adapter. Pin 1 is VCC and should be left disconnected. Pin 2 is TX and goes to RX on your adapter, pin 3 is RX, and pin 5 is GND.
Your serial port should show up on your Linux box as /dev/ttyUSBx, most likely ttyUSB0 if you have no other USB serial devices. My preferred serial communications program is kermit. Start kermit from the terminal and enter:
set line /dev/ttyUSB0
set speed 115200
connect
Let the SPA122 boot up and verify that you're seeing the serial console and that pushing enter a few times will get a login: prompt. Then unplug power from the SPA122, hold down the space bar, and plug power back in. You should be dropped to a firetux # prompt.
Enter these commands at the firetux prompt to get the SPA122 booted into Linux and a busybox shell:
setenv bootargs $bootargs init=/bin/sh
boot
Once you're at the shell you need to make the mtd devices available:
mount -t proc proc /proc
mount -t sysfs sysfs /sys
mount -t tmpfs -o size=64k,mode=0755 tmpfs /dev
mdev -s
On both of my units the nvram is on mtdblock9. To check for sure, cat /proc/mtd and look for the NVRAM partition.
# cat /proc/mtd
dev:    size   erasesize  name
mtd0: 00300000 00020000 "u-boot"
mtd1: 00300000 00020000 "u-bootenv"
mtd2: 01300000 00020000 "ROMIMAGE"
mtd3: 00800000 00020000 "HALFIMAGE"
mtd4: 01180000 00020000 "LINUX_ROOTFS"
mtd5: 00400000 00020000 "HS_FW"
mtd6: 00400000 00020000 "FPAR"
mtd7: 00300000 00020000 "CISCO"
mtd8: 00300000 00020000 "EEPROM"
mtd9: 00400000 00020000 "NVRAM"
mtd10: 00300000 00020000 "CA_DATA"
With the mtd devices online, you need to mount the nvram partition so you can edit the nvram.data file:
mount -t jffs2 /dev/mtdblock9 /nvram
The nvram.data file is binary, but the sed in the built-in busybox is able to handle it ok.
mv /nvram/nvram.data /nvram/nvram.data-old
sed -e 's/admin,enc=.*,0/admin,admin,0/' < /nvram/nvram.data-old > /nvram/nvram.data
umount /nvram
With the nvram now edited and unmounted reboot the SPA122 by power cycling it. When it finishes booting back up you can go to the web interface and login as admin/admin. From there you can upgrade the firmware and then do a factory reset and log back in and configure your SIP devices and any other settings you'd like to change.
Optional things
The built-in busybox is rather limited. If you'd like to make backups of things then you can download a more complete busybox to a RAM partition. In order to do that you'll need a regular http server on your LAN (the built-in wget doesn't support https and SSL) and you'll need to bring up the ethernet on the SPA122 manually. I'm not going to get into how to setup a web server on Linux, there's plenty of guides out there on doing that.
You can download a pre-compiled busybox binary for the ARMv5L on the SPA122 from here. Put the busybox-armv5l binary on your web server so that the SPA122 can download it. To get the MAC address, look in the console boot messages for a line like device_id = CC:D5:39:F2:AA:34.
ifconfig lo 127.0.0.1
ifconfig eth0 hw ether cc:d5:39:f2:aa:34
ifconfig eth0 192.168.15.1 netmask 255.255.255.0
ifconfig eth0 up
route add -net 192.168.15.0/24 eth0
mount -t tmpfs -o size=2M,mode=0755 tmpfs /mnt
cd /mnt
wget http://192.168.15.10/busybox-armv5l
chmod +x busybox-armv5l
Replace the 192.168.15.10 with whatever 192.168.15.xxx address you configured on your http server.
You now have a more complete busybox that has handy things like hexdump, uuencode/uudecode, and ftpput which you can use to make backups of the SPA122.
How to lock it back up?
Before I flashed new firmware onto the RingCentral SPA122 I made sure to copy the entire 32MB nand flash off, just in case I needed to restore it. For fun I did try restoring it through the firetux uboot, but I guess I needed to backup something else because while I can get the older 1.2.1 version back on there, the SPA122 remains unlocked with no indication it was ever tied to RingCentral. I'm not sure what I forgot to grab, and it doesn't matter a whole lot since I wanted an unlocked SPA122 anyway. But I sort of feel like my research is incomplete. If you have a locked SPA122 or SPA112 you'd like to donate, let me know!


+1 Posted by mike • Aug.02.2020 at 19.52 • Reply
what " 3v3 USB TTL serial adapter" did you use? I would like to order one online
+1 Posted by Chris • Aug.04.2020 at 23.41 • Reply
Hey Man, Great tutorial. Wondering if you can tell me what kind of "3v3 USB TTL serial adapter" you used? Looking to purchase one myself to try this out.
Thanks!
+1 Posted by Nick • Jun.12.2020 at 21.41 • Reply
Hi, First, thanks for this tutorial...
I´ve managed to connect to my locked SPA122 with my USB TTL and I´ve followed your indications... but still no joy. Once I make the sed command and the umount I power up the device but not getting IP from my router´s DHCP server. If I dial **** with the phone is still asking me for the password.
After that I´ve tried to reset again with the button but the output that I get is: Not allow to reset to factory-defaults... GPIO 6: 2
I´m going to read all the nvram.data file to check if I have to change anything else in it... but. Can you give me some additional suggestions?.
Thanks and best regards
+1 Posted by Nick • Jun.12.2020 at 22.16 • Reply
More info... I´ve compared the nvram.data and nvram.data-old that I´ve generate in the first time.. I can see how in the nvram.data the password of admin is NOT encoded, OK. I´ve seen also that there is a second account cisco which this one it´s also encoded... maybe It´s better also to change that line with sed as we made with admin...
Anyway, seems like there is something more that I´m missing to enable the discovery of the device in my network
+1 Posted by FozzTexx • Jun.13.2020 at 16.48 • Reply
If you're not getting an address from DHCP that doesn't have anything to do with whether or not the device is unlocked.
+1 Posted by Nick • Jun.14.2020 at 09.37 • Reply
I have the internet port of SPA122 connected straight to my router... But, I can´t find the MAC address of the device. I´ve been also checking in apps like Fing where I can see all my devices connected to my network but doesn´t appear there. I´m pretty sure of that because I can see the MAC address printed in my device and also in the output in the terminal when I´m connected with USB TTL. Maybe nvram.data has some clue about that?
+1 Posted by FozzTexx • Jun.14.2020 at 14.14 • Reply
Sounds like a problem with your router or your ethernet cable, I can't help you with that. Or perhaps the ethernet port on your SPA122 is dead.
+1 Posted by Nick • Jun.14.2020 at 21.32 • Reply
Issue solved! It was the cable, specifically, the connector of the cable in the router... I didn´t noticed that the clip was broken and it was not doing a correct connection :-(
Thank you very much for your help and for the tutorial! Kind regards
+1 Posted by Sc00by • Sep.17.2021 at 08.13 • Reply
I am trying this on one of these units but the sed line is not changing anything. It's creating the old and writing the new file but the httpauth line is unchanged. My unit also has httpenable=0. I have tried all combinations with sed to change it to 1 but no joy. Any advice?
+1 Posted by William • Sep.25.2021 at 22.37 • Reply
Two things: One, a Raspberry Pi works really well to deal with 3.3V TTL serial. Second, the cadata directory contains the magic restricted profile stuff and things that change the admin password. Fixing up stuff in that directory (custom.dat and flatprofile.xml) let me actually restore mine to stock.
+1 Posted by GBZ • May.11.2022 at 18.47 • Reply
Thank you so much for this article, I managed to unbrick my SPA122 with a broken LAN port. The web interface isn't reachable over the WAN port by default. If anyone happens to have the same problem, you can enable the web interface on WAN by changing the property "remotemanagement" from nvram.data. I modified the sed command to the following: "sed -e 's/remotemanagement=0/remote_management=1/' < /nvram/nvram.data-old > /nvram/nvram.data".
+1 Posted by Kevinds • Feb.09.2024 at 02.53 • Reply
You could do that with just IVR commands..
**** pause 201# pause 0# pause 1 pause hangup
or
**** 7932 # pause 1# pause 1 pause hangup.
+1 Posted by GBZ • May.11.2022 at 18.48 • Reply
Thank you so much for this article, I managed to unbrick my SPA122 with a broken LAN port. The web interface isn't reachable over the WAN port by default. If anyone happens to have the same problem, you can enable the web interface on WAN by changing the property "remotemanagement" from nvram.data. I modified the sed command to the following: "sed -e 's/remotemanagement=0/remote_management=1/' < /nvram/nvram.data-old > /nvram/nvram.data".
+1 Posted by SteveY • Oct.20.2022 at 23.17 • Reply
Great Post, been trying to do this for years, you are a Genius!!
+1 Posted by Andrew • May.11.2023 at 23.30 • Reply
I'm super interested in your work - I have an ATA190 that are useless outside of an enterprise environment (They only work with CUCM). However, they are IDENTICAL to the SPA112. Same RAM, ROM, UC etc. Even the board number is the same, they just have different firmware by the looks. The downside is that the ATA190 will only load 'signed' firmware via tftp (So can't fool it into loading SPA firmware) and does not have a firmware upgrade option in the web gui. I'm keen to see what methods I could use to crossload the SPA firmware on to it.
I tried your method of getting a root shell but it does not work on my ATA190, it just boots normally. Did you ever get access to the passwd file on the SPA? Perhaps it is the same password for the ATA190?
+1 Posted by peter • Sep.23.2023 at 07.18 • Reply
Thanks for the blog, I used it to debrand a Cisco SPA323D, the only real difference being the header. I'd got as far as getting access to the console and was trying to play with the NVRAM but would never have thought of the trick of making bash as the bootargs to bypass login!
Would I be ok to link from my blog to yours as you don't mention the SPA232 here?
+1 Posted by peter • Sep.23.2023 at 07.21 • Reply
Thanks for the blog, I used it to debrand a Cisco SPA323D, the only real difference being the header. I'd got as far as getting access to the console and was trying to play with the NVRAM but would never have thought of the trick of making bash as the bootargs to bypass login!
Would I be ok to link from my blog to yours as you don't mention the SPA232 here?
+1 Posted by peter • Sep.23.2023 at 07.34 • Reply
Thanks for the blog, I used it to debrand a Cisco SPA323D, the only real difference being the header. I'd got as far as getting access to the console and was trying to play with the NVRAM but would never have thought of the trick of making bash as the bootargs to bypass login!
Would I be ok to link from my blog to yours as you don't mention the SPA232 here?
+1 Posted by peter • Sep.23.2023 at 19.57 • Reply
Thanks for the blog, I used it to debrand a Cisco SPA323D, the only real difference being the header. I'd got as far as getting access to the console and was trying to play with the NVRAM but would never have thought of the trick of making bash as the bootargs to bypass login!
Would I be ok to link from my blog to yours as you don't mention the SPA232 here?